KEEPING IT ON
THE ROAD - A SURVIVAL GUIDE
Note:
Everything described here is based on my own experiences. I will not
be responsible for any potential damage of
you or your car. I also assume a certain level of experience - if you've
never done any major work before on your Pug,
think about getting a professional to do it for you, or to teach you
how to do it.
|
Bosch
K-Jetronic
One day my STI lost power above 4000 rpm. This
got worse everyday until the car was barely driveable. I checked
and tested everything, from ignition to fuel pressure, but every
component was just fine. It turned out that the fuel flow was
much to low, this is measured by disconnecting the fuel return
line and should be 750 ccm in 30 sec.
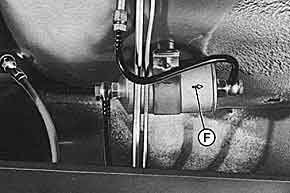
Hollow
bolt at left side of filter must
be shortened, (F) is flow direction
|
|
The
restriction of fuel flow was caused by a too long hollow bolt
at the main fuel filter input, in combination with a slightly
plugged filter. The bolt must be 23,5 mm instead of 26 mm,
so I shortened this one and had full power again. This problem may
occur, according to a PEUGEOT service information, on cars
until chassis no. 1.247.000 - just like mine...
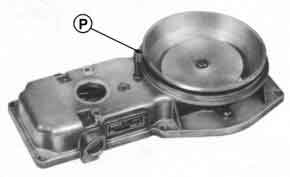
When
I checked the K-Jetronic for correct operation, I found
the plug (P) for the adjustment screw missing on the airflow
device. This is missing on almost every early 505 and
allows dirt to be sucked in. I made a new one myself.
|
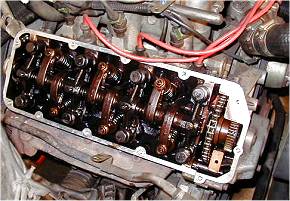
Adjusting
valve clearances ZEJ and ZN3J engine
When I bought the STI, it had a very rough idle.
So I checked the valve clearances, and found 3 exhaust valves
to have almost zero play. The clearances defined by PEUGEOT
for the ZEJ engine are (cold):
Inlet:
0.10 mm
Exhaust:
0.25 mm
To have a smoother idle, and more grunt from low revs, of course
in expense of a little bit less max power at high revs and a bit
more valve noise, I set the valves 3/100 mm greater (0.13 inlet
/ 0.28 exhaust), resulting in a "tamer" timing.
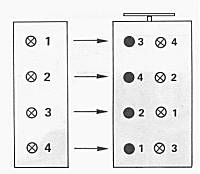
The procedure for setting the valves on the 4 cyl ZEJ is
simple (remember though that PEUGEOT defines cyl no 1 as
the closest to the firewall):
Ex No 1 fully open: Adjust In 3 / Ex 4
Ex No 2 fully open: Adjust In 4 / Ex 2
Ex No 3 fully open: Adjust In 2 / Ex 1
Ex No 4 fully open: Adjust In 1 / Ex 3
In contrast,
my ZN3J engined 505 V6 was very noisy when bought.
Removing the valve covers takes some time here. Note that the
V6 with the casted valve covers has different cover seals as the
tin-covered versions. Valve clearances are the same as with the
ZEJ engine. I also adjusted the valves to Inlet:
0.13 mm / Exhaust: 0.28 mm. Absolutely worth it!
There are two procedures for setting the valves on a ZN3J:
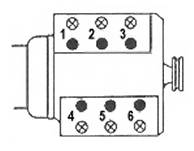
Procedure 1:
No 1 firing TDC, No 5 rocking: Adjust In 1 2 4 / Adjust Ex 1 3 6
No 1 rocking, No 5 firing TDC: Adjust In 3 5 6 / Adjust Ex 2 4 5
Procedure
2:
Adjust only
one side of the engine at a time:
Left cylinder bank:
No 1 rocking: Adjust In 3 / Ex 2
No 2 rocking: Adjust In 1 / Ex 3
No 3 rocking: Adjust In 2 / Ex 1
Right cylinder bank:
No 4 rocking: Adjust In 6 / Ex 5
No 5 rocking: Adjust In 4 / Ex 6
No 6 rocking: Adjust In 5 / Ex 4
|
|
Procedure
for setting the valves on ZEJ engine
ZEJ
valve train, after removing injectors and valve cover
Procedure
1 for setting the valves on ZN3J
ZN3J
valve train right cylinder bank (cyl 4 - 6)
|
|
ZF
3HP22 / 4HP22 automatic gearbox
If you have
an automatic gearbox, change the oilfilter-mesh right under
the oilpan as these get clogged up with age. The mesh is so fine
that it's impossible to clean. Buy one from a ZF dealership, and
you'll get away with about € 20. Just tell them the type
no. and serial no. (production plate on left side of the gearbox).
I did the job on my ZF 3HP22 equipped STI, and also on
the V6 which has the "famous" 4HP22 'box. Since
then especially the old 3-speed box shifts much smoother and reacts
quicker. Change the ATF every 30.000 km, as recommended by
ZF. When changing oil & filter about every 90.000
km, you'll need
3.0 to 3.5 litres ATF (to old DEXRON II spec)
Don't
forget give the oilpan a good clean inside, including the two
small magnets. The oil-pan rubber seal can be reused if in good
condition. Sounds
too easy ? Ok, you'll need a 27 TORX bit to unscrew
the filter.
|
|
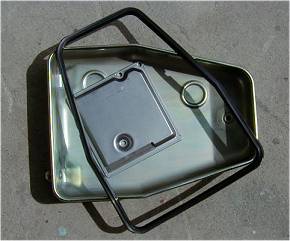
Cleaned oilpan
of ZF4HP22, new filter and gasket
(here for 1987 PEUGEOT 505 GTI)
|
|
Electrics
On pre-82 models, the printed circuits
in the fuse and relay-box (on the left strut tower) suffer from
high electrical resistance due to bad connections and oxidation:.
Plugs and board can get so hot that the plastic
is melting
I broke down twice with my STI because the printed circuit separated
from the board just under the plug which also feeds the fuel
pump (with 16 A!). I purchased a new board and cleaned all
connections, but this did last for only one year when the
electrics started to play up again.
PEUGEOT
recommends changing board and plugs with the later type, but instead
I took a new board and soldered new cables directly on
this. The new cables are then connected via new BOSCH plugs
with the old harness. This repair should be durable and is invisible
when you open the fuse box.
Actually, the pre-82 design of the fuse box is the cause for
many inexplicable electrical faults...
|
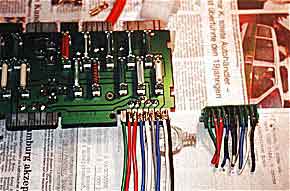
|
Modifications
to pre-82 fuse board
 |
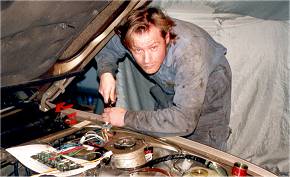
Getting
things done on the STI
 |
|
|
Sunroof
Much has been said and written about how to get
the sunroof to work properly. When I purchased the STI, the sunroof
was badly corroded and had to be replaced with a good
used one. I then installed new slide-shoes and also
a new rubber seal.
The cable was pulled out and lubricated with a combination
of graphite grease and silicone spray. The rails
received the same treatment. Since then I can enjoy a sunny day
with a working sunroof, although it took some time to align
the roof properly, because a bad alignment causes jamming.
On some cars the sunroof stops functioning because of the cable
guide breaking where it's attached to the motor. There are
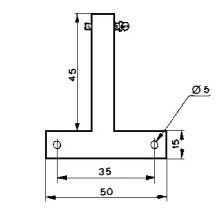
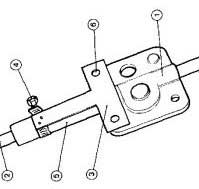
quite a number of fixes around, here's the official factory
solution for that problem (picture top right):
Use 2mm sheet metal, best would be stainless steel. The
hose clamp is soldered or welded on the stiffening
plate. Mount according to the picture right.
Most sunroof problems - apart from rust - are related to the cable
guide: On my 505 V6, the platic cable guide separated from
the bushing, which is attached to the roof cross-beam and from
where the metal rail begins. It was realativly easy to undo the
right C-pillar trim and the passenger handle and to lower the
rear of the headlining. I glued the guide back into the bushing
after degreasing it, and the sunroof works faultless now.
|
|
Bracket
made from 2mm sheet metal...
...and
how it's installed
|
|
505
spare parts
Spares are quite easy to get here in Europe from
your local PEUGEOT dealer or any motor-factor for something
like oil filters, brake parts or dampers - as long as it's not
for the interior or an early 505 (like my STI, you've guessed
it) and you don't care about your wallet...
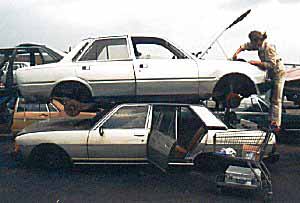
4
years ago: Stephan Sontag parting out
a 505 SR at the local breakers yard.
Seldom sight below is 604 V6 SL. Wish
I'd bought some parts back then...
|
|
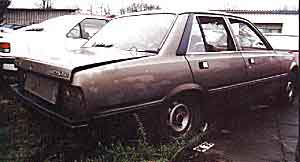
Second
hand parts are really scarce over here, same thing in France,
so I was happy when I found the unlucky 505s pictured left
and above. They'll help to keep my 505s on the road for many years
to come... if I will ever find a good ZEJ (829) engine
as a worst-case backup for the STI.
The 505 GL pictured above for example still yielded
some useful parts as heater unit, wiper motor and tail lights.
Some days later I found another parts car, a swiss 1984 505
GTI, with heated seats and like-new rear brake calipers...
|
|