|
O
W N E R S H I P G U I D E - Y O
U ' R E N O T A L O N E . . .
Note: Everything
described here is based on my own experiences. I will not be responsible
for any potential damage of you or your car. I also assume a certain
level of experience - if you've never done any major work before on
your 605, think about getting a professional to do it for you, or to
teach you how to do it.
ENGINE MOUNTS
|
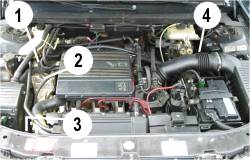
The
engines mounts are a weak spot of the 605 with
ZPJ/ZPJ4 V6 engines. If your car suffers from annoying
vibrations, like mine did, chances are high that those mounts
are shot. The V6 has four: (1) and (2) top right
of the engine block, (3) down right between alternator
and oilpan, and (4) left above the gearbox. I had to
change all of them, as really all were gone...
|
|
Overview:
Engine mounting (1) gets attached to no. (2).
There is another bush between (1) and the body, but this
never fails.
|
|
Replacing
mount (4) is straightforward. Jack up gearbox, push all
cables away, remove old mount, put in the new one, adjust it
by hand, then tighten screws of no. (4) to body with
30Nm.
|
|
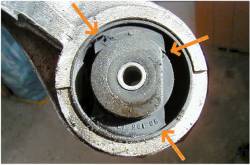
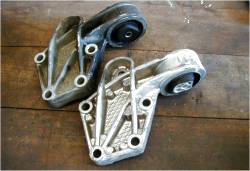
If
you're lucky, the rubber bushings for (1) and (3)
are available as a single item, if not, prepare to splash out
more money on the bushes already fitted to the aluminium brackets.
Shown above is no (1), the arrows pointing to the cracks
separating the bush from the bracket, resulting in almost no
damping, hence the vibrations.
|
|
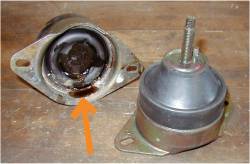
The
engine mount (2), which becomes attched to no. (1),
is hydraulically damped. Mine had cracked, spilling all
it's oil (see arrow), rendering it useless (after changing all
engine mounts, as described here, the vibrations were gone).
The new mounting (right) went in without any problems.
|
|
I
had to buy mount (1) as a complete item. The new part
is clearly visible. After changing all engine mountings / bushes,
take great care to positioning the engine correctly. The dimension
to install (2) needs to be checked (see photo below left).
I used three hydraulic jacks, two under the engine, one under
the gearbox. Also no. (2) is adjustable, like the no.
(4).
|
|
Dimension
between mount (2) and body must be 201mm. Tighten
nuts to body with 30Nm, the central nut to mount no.
(1) with 45Nm. The four nuts which bolt no. (1)
down on the engine block need 15Nm.
I purchased no. (3), see picture top right, as a bush
only. The procedure to change it is the following:
|
|
Remove
complete bracket of (3) from car after jacking up the
engine, destroy old bush to get it out, then clean bracket with
emery paper, and file a champfer on one side. Apply anaerobe
glue supplied with the bush. Use a big (!) press to overcome
the almost 2mm overlap between bush and bracket. Press from
champfered side. Be careful to appy pressure only to the hard
plastic outer ring of the bush, otherwise you'll destroy it!
|
|
Good
luck! |
|
FRONT SPOILER
|
|
|
|
|
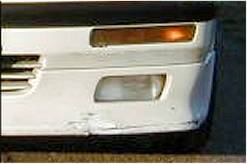
My
car was fitted with a gutmann Royal Look
body kit from new. Unfortunately, the front spoiler
was cracked and had been badly repaired.
|
|
As
the gutmann kit is extremely rare, I changed it for a
Musketier
front spoiler, which not only looks close to the original one,
but allowes a better air flow. Pictured above, the Musketier
spoiler is trial fitted
|
|
The
spoiler is attached by just 7 screws: Two in each wheel
arch, and three in the front air inlet. After I had mine professionally
sprayed, I screwed it back on, using a small amount of body
sealant. I love the looks...
|
Next: Water thermostat, front
& rear suspension overhaul
|